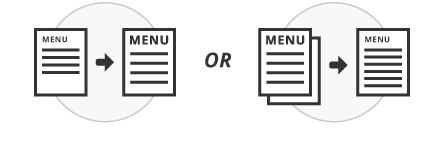
Tools and settings to help you make menus faster.

Since iMenuPro runs in your web browser you can utilize your web browser's spell-checker as you enter text (most web browsers flag misspelled words as you type them).
Browser dictionaries, however, do not contain common culinary terms, adopted ethic words (your browser will likely flag Panini as misspelled) or brand names. And if you switch browsers or move from computer to computer, it's difficult or impossible to maintain a consistent personal word list.
With iMenuPro's Spell Check you'll be able to use your own personal dictionary on any browser and from any device, and you'll get the benefit of thousands of culinary brands, words, and terms (including Panini) that are built into its spell checking dictionaries.
To run a spelling check on your menu, use Tools > Spell Check. If any words exist on your menu that are not found in the iMenuPro dictionaries the Spell Check box will appear with the first potentially misspelled word highlighted.
The following options appear in the Spell Check box:
This field displays the potentially misspelled word, and below that, the context in which it appears on your menu with a list of suggestions. If you're sure the word is spelled correctly, click Add to dictionary. To use one of the suggestions, select it from the suggestion list and click Change. If you want to ignore the spell-checker suggestions for a given word, click Ignore to move on to the next word.
Tip! If the suggestion you want does not appear, and you'd rather not add the word to your personal dictionary, you can edit the word directly in the text box and then click Change.
Ignores the misspelled word (all ignores every occurrence of the word within the current element being checked).
Changes the misspelled word to the highlighted selection under Suggestions (all changes all occurrences of the word within the current element being checked).
If you Change a word you can Undo the change if the spell-checker is still within the current element being checked.
Adds the highlighted word to your personal dictionary.
Displays your personal dictionary where you can Add, Remove, or Search your dictionary for specific words.
Allows you to set your native language (languages other than English variants do not include common English culinary terms).
Immediately ends the spelling session. Note that if you click Done your entire menu may not be spell checked.
Make it FIT takes your current menu and automatically adjusts page spacing and font sizes to make it fit onto a single page. It uses an algorithmical secret-sauce method to not only make your menu fit, but retain your overall design aesthetic as well.
It's extremely useful for any single page menu such as daily specials.
To use it, select the Tools > Make it FIT command or click on the toolbar.
Tip! Once the FIT process is done, you can use Edit > Undo FIT to return your menu to its original state. You can also use the page spacing and font buttons on the toolbar, at any time, to shrink or expand page spacing or fonts sizes yourself.
Page Spacing changes the amount of space between menu items (food items and headings) on a particular page. You can quickly adjust this spacing by clicking or on the toolbar. This lets you add more or less spacing in a uniform manner to your menu content so it retains its design aesthetics and fits onto a particular page. The toolbar buttons also let you see the changes in real-time on your menu page after each click.
The amount of spacing applied to a particular page appears at the top status bar next to Spacing:. A value of 0.0 means no page spacing is being applied to the current page. A negative number means the page spacing is being shrunk. A positive number means the page spacing is being expanded.
Page Spacing changes made with the toolbar buttons are applied in increments of your choice using Tools > iMenuPro App Settings. There you set the amount applied per each click of of the toolbar buttons.
To set an exact Page Spacing value on the current page you are viewing, use the Tool > Page Spacing command. The allowed range is from -0.20 to 2.0. The toolbar buttons usually provide better feedback however, since page spacing can vary from style to style.
Click on the toolbar or use the Tools > Page Spacing command.
Click on the toolbar or use the Tools > Page Spacing command.
Click on the toolbar or use the Tools > Page Spacing command. Note: Switching Menu Styles also resets the page spacing.
Click Expand Page Spacing on the toolbar to remove white space at the bottom of the page.
Tip! There are other methods to change the spacing on your menu such as Custom Spacing (for any Food Item and Heading) or Line Spacing which add spacing within the actual food item or heading, but Page Spacing should be your first choice as it uniformly spaces the food items and headings without having to change individual item spacing.
Clear All provides a method of removing certain elements from your menu without having to start a new menu.
This can be useful if you are editing a copy of a menu that contains more elements than you need on the copy. Or if you just want to start over and clear away certain elements such as all food items, images, floating text, etc.
To clear stuff, simply use Tools > Clear All and check the boxes for the elements you want cleared, and then click OK.
NOTE Heading accents do not get removed but instead get reset to (style) meaning they adopt whatever accent your current menu style is using..
Auto Bin/Number lets you automatically add Bin/Numbers to all food items that are on your menu. Choose the options you want and then click OK and iMenuPro will add the Bin/Numbers.
The following options are available:
Enter the number here that you want the auto-numbering to start at.
If you want to have a prefix of letters, numbers, or symbols that precedes the number, enter that here. For example to have the numbers be C1, C2, C3, etc. enter C for the prefix. The prefix can be up to 3 characters.
Check this box if you want a period after the number, such as 13., 14., etc.
Check this box if you want any Bin/Numbers that are currently on the menu to remain unchanged. This lets you replace just the Bin/Number entries that are blank. If this box is not checked, all food items on the menu will have their Bin/numbers replaced.
Tip! Once Auto Bin/Number is done, you can use Edit > Undo to return your menu to its original state.
Smart Mark uses a built-in word list to replace words that should normally be written with accent marks (diacritics). For example it can replace Entree with Entrée.
You can add your own word-pair replacements or remove unwanted ones, or you can disable Smart Mark entirely under Tools > iMenuPro App Settings. If Smart Mark is turned on, iMenuPro searches for and replaces words in the word list after each food item, heading, footer, or floating text is edited.
The following options are available:
This field should contain the word that you want replaced. The Replace and With words will be added to the Word List when you click the Add button. Unless the word is always capitalized, enter it in lower case.
This field should contain the word that is replaced by the word currently listed in the Replace field. The Replace and With words will be added to the Word List when you click the Add button. Unless the word is always capitalized, enter it in lower case.
Removes the highlighted word pair selection from the Word List.
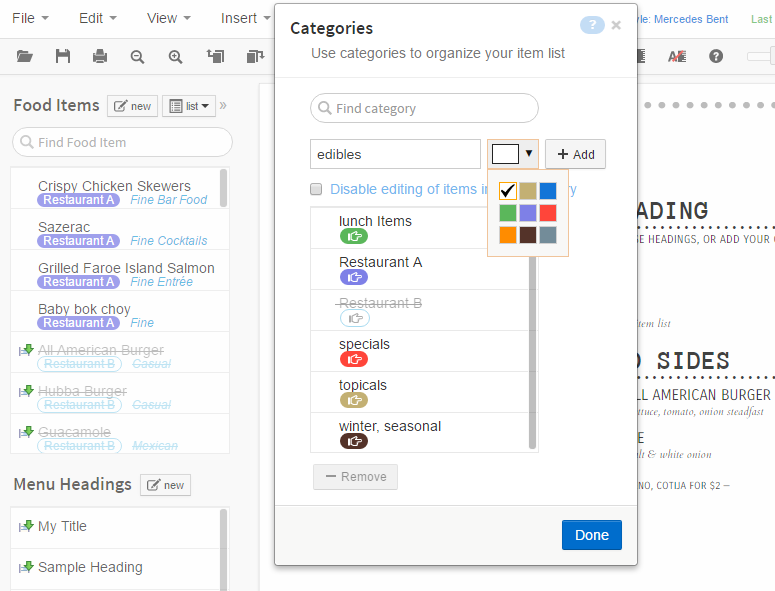
The Category Labeler allows you to label your foods with color-coded category tags to better organize your food list.
lunch items
seasonal, winter
Restaurant B
edibles
Categorizing is especially handy for large food lists or multi-establishment setups. Categories do not appear on or affect menus – they are a list management tool.
You can add dozens of categories and can edit them at any time. Once edited, the changes will automatically apply to any items that are labeled in your food list.
The following options are available:
Enter the text for the new category you want to add in this field. Then click the Add button to add it to your list of categories.
Click a category in your list to select (highlight) it and edit it. Once selected, you can change the text, color, or disable option for the category. When done editing, click the little OK button next to the text. To discard your edit, click the little X button.
Lets you pick the color for any new or edited category label. Choosing white means the label will have no color fill.
Checking this box will prevent food items tagged with this category from being edited. The items will appear muted in the food list (grayed out) to indicate disabled. Removing the check will re-enable editing for items tagged by this label. This allows you to effectively block certain groups of foods, at once, from being changed (edited). It also alerts you to groups of foods you might want to avoid using for certain menus.
NOTE You can still use disabled foods on your menus - you just can't edit them. And if an item tagged with a disabled category is already on a menu, it will remain there unless you remove it.
The Remove button removes a selected (highlighted) category from the category list and also removes it from any food item tagged with this category label. Be careful with Remove as this action is irreversible.
"QR code (abbreviated from Quick Response code)."
Wikipedia
The point of QR is speed. The last thing you want is a belabored QR code menu conversion process from your printed menu, or worse, having your customers wait for slow downloads on their smart phones because of a sluggish backend implementation. And maybe worst of all – customers viewing stale menu content because they didn't refresh their browser page.
That's where QR Ultra comes in.
QR Ultra offers many advantages and enhancements over standard live-sync QR menus.
First and foremost is speed. Utilizing advancements from our live-sync technology, QR Ultra menus load faster worldwide, and content updates so fast that refreshing your browser page to see the newly updated content is not even required. Your menu updates literally appear – for every customer – even if they haven't refreshed their page.
Additionally, the new appearance themes for QR Ultra were specifically designed for mobile devices, meaning they load faster and have a higher readability index across the board. Plus you can get creative and fancy on the actual QR code itself, with multi-color designs, dot patterns, and even add your own logo inside the QR code. And we've added new options to turn your QR page into a virtual menu hub for your business, enabling you to host several different menus at once using just one QR code.
The following options are available:
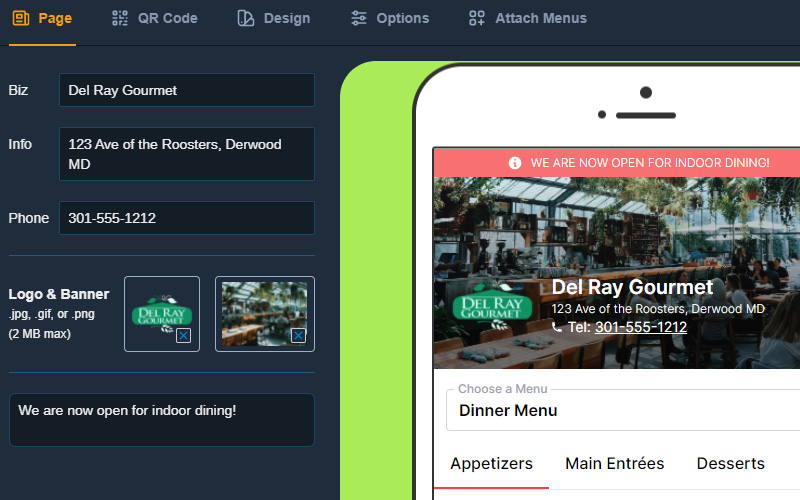
The name of your business or page title appears at the top of your QR page.
This appears in smaller text below your business name. You can use it for your address, email, phone number or any fine print that you want to display on your QR page.
Adds a clickable phone icon that lets your customers instantly call you from their smart phones to place an order or inquiry about something else.
Lets you add an outgoing link to the page (the link text will appear on the page and be clickable as a web link). You can use this to link to your website, to an ordering platform, or anything else.
A business logo and banner image that will appear at the top of your QR page. You can use one or the other, or both.
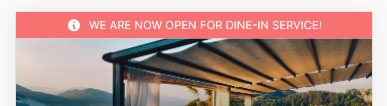
This optional message appears at the very top of your QR page, and is great for notifying customers of recent changes to your business or notices of special events.
The shape of the inside QR pattern pieces, traditionally Square.
The type of frame design that can optionally surround your QR code. Some of the frames have pre-selected "call to action" text. You can change that here too with canned phrases like Scan Me or View Menu.
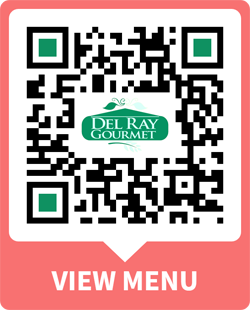
Use this to change the color of the border elements that surround your QR code.
Use this to change the color of the corner squares within your QR code. Hint: keep this color relatively dark to prevent scanning errors.
Use this to change the color of your QR code's optical label (aka square grid or matrix). Hint: keep this color relatively dark to prevent scanning errors.
A logo that will appear in the center of your your QR code.
To download the QR code, click the Download PNG button. Once you have the PNG image of your code downloaded, you can use it in any image editing software and, of course, in iMenuPro. To upload it back into iMenuPro so it can used on a flyer or table tent, simply use the Insert > Uploaded Image command, and then add it to a menu as would any other image.
If you want instant QR codes without having to create a flyer or table-tent, just use the Print as PDF button to create either a 4-UP table tent or a page with 16 smaller QR codes (4 per row). Click the 4 or 16 next to the Print button to toggle the PDF printing options between 4 and 16.
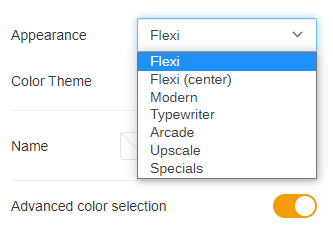
A list of themes that come with preset fonts and colors.
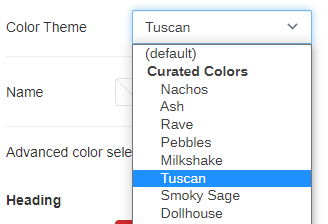
A list pre-selected palettes if you want to customize the Appearance colors. The special option Match Printed Menu will match the colors of your current iMenuPro menu.
Use to customize your business information that appears at the top of the page.
Use to customize the background color of your QR menu.
Use to customize the background color of the "Welcome Message / Alert" that appears at the top of your QR menu page.
Turn this toggle ON to customize colors of specific elements of your QR menu. Once on, options will appear that allow you to customize each type of heading and each element of your food items. If the toggle is OFF, you can still customize all headings and food items by using the general Heading or Food Item color selector.
Use this option if you have a long menu and want to give users the ability to navigate, rather than scroll to different sections of your QR menu. A navigation tab will automatically appear for each normal or alt-font menu heading.
Advanced Tip! You can exclude any heading from appearing in the navigation bar by adding some special html text to the heading. This text will not appear on your printed menu and will instruct QR Ultra to exclude the heading when it builds your navigation bar. In the example below the special imp-no-tab text that surrounds the heading "Our organic guarantee" will prevent it from being added to the navigation bar.
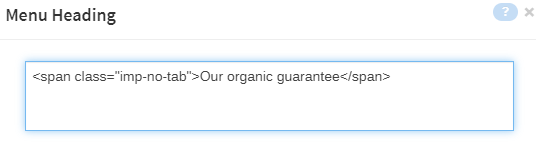
Similarly, you can use imp-yes-tab to include a heading on the navigation bar that would normally be excluded, such as a subheading or a Title heading.
Lets you decide where to put your floating text. Since there's no real concept of printed pages on the web - a web browser's viewport constantly changes size depending on the device (phone, tablet, desktop, etc.) - the floating text is positioned at the top or bottom of your QR menu, or hidden completely.
Use this option to include the date and time (on the QR menu page itself) when the menu was last synced.
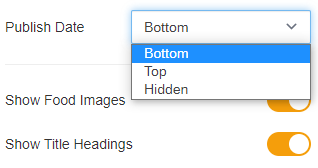
If this option is set to hidden, no food images will be shown. Setting this option to Fit Image lets you display the entire image as the thumbnail rather than a zoomed in version of the image. This can be useful if your images are "tall" rather than "wide", such as bottled drinks.
If this option is disabled, all Title headings will not be shown.
If this option is disabled, all food item Bin/Numbers will not be shown.
If this option is disabled, all food item prices will not be shown.
If this option is enabled, a customizable note link for all items that have a hashtagged note will be displayed. This can be used to display dietary or other information about your items.
If this setting is checked, iMenuPro will automatically sync your QR Ultra menu to your printed menu whenever you save your menu (this excludes automatic menu saves by the app such as Auto-save, automatic save at logout, etc.). If you'd prefer to sync your QR Ultra menu only at specific times (useful if you're making lots of edits to your printed menu that you don't want reflected on your QR menu) then leave this setting unchecked.
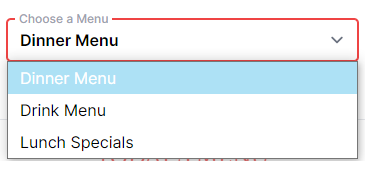
If your QR Ultra menu page has only a single menu, you won't need this section. But if you want to attach multiple menus to the same QR code you can use the features below to achieve that.
Attaching menus to your QR menu page allows it to act as a hub where customers can scan your QR code and then select and view various menus from a menu selector.
This is the name that will appear in the Menu Selector for this QR menu. It will appear at the top of the selector list.
You only need to name your primary menu if you have additional menus attached to your QR Ultra page and you have the Menu Selector option set to on (the menu selector enables your customers to navigate directly to specific menus rather than having to scroll through the entire page).
The top list contains menus that are added to the current menu page. The bottom contains a list of menus that have been synced using QR Ultra. You can click the + icon on any menu in the bottom list to move it to the top list, thereby attaching it to the current QR menu page. You can click the - to remove a menu from the top list.
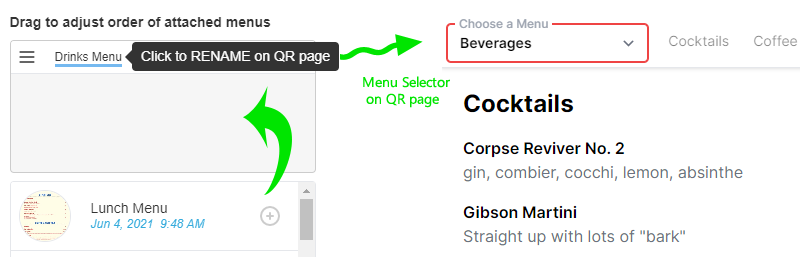
If you have more than one attached menu you can drag them in the list to change the order in which they will appear on your QR page. Click the ≡ symbol to drag them.
Make sure to name the attached menus so they have the name that you want your customer to see when they appear in the menu selector list. You can use whatever names you want for the primary menu or attached menus - they will not affect your iMenuPro filename.
Click on them, once you've added them to the top list, to rename them.

Determines whether a Menu Selector will appear on your QR menu page or not. Switching to on allows your customers to choose between your current (primary) menu and any menus that have been attached (see above).
Switching to off removes the menu selector from your QR menu page – the attached menus will still appear on the page however. Use this option if you want to attach menus, but don't need a selector.
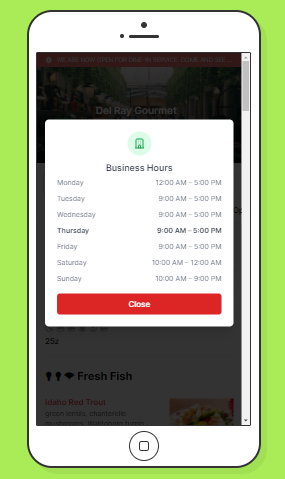
Here you can set the hours, for each day of the week, when you're open for business. You can use 12 hour notation or 24 hour military time.
You can set up to 2 time ranges per day, i.e. Lunch/Dinner operating hours. To add another time range for that day, click the next to the corresponding day.
If you want to remove the additonal time-range that you added, click the next to the associated day.
Your customers will be able to click an icon on your QR page to see your business hours for the entire week.
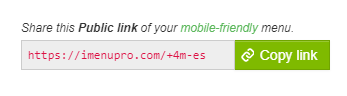
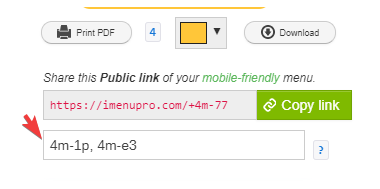
Along with the QR code, you'll receive a Public Link that hosts your live menu page permanently, independent of your website. This is the link where your customers will "land" once they scan your QR code. You can share this link on social media and share it with customers directly, even if you don't have a website. You can also use it as your Google My Business menu link URL. The Public link does not require a website and, in most cases, should not be used in your website – use a Live-Sync menu Embed code, or QR Ultra Embed code for that.

HTML embed code
Copy this HTML code and insert it directly into your website to display your QR Ultra menu. This code can also be used on any website builder that supports inserting HTML code or snippets.
Example using Squarespace with QR Ultra Embed Code
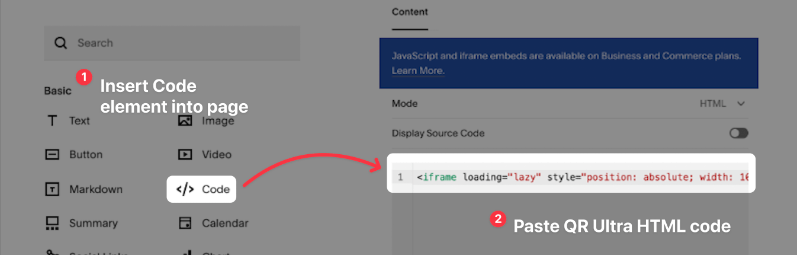
If you are having issues inserting the embed code properly into your website, refer to your specific web builder's instructions regarding HTML code insertion.
Smart URL embed link* Beta
If your web builder supports adding an embed URL, you can use this link to display your QR Ultra embed menu on your website.
Example using Squarespace** with QR Ultra Smart Embed Link
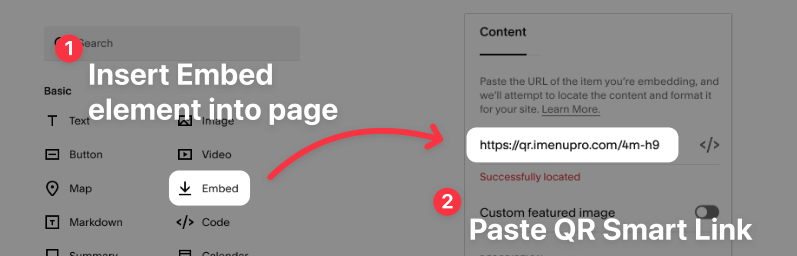
**If not supported for your application, use QR Ultra Embed Code instead.
If you are having issues using the Smart Embed Link with your web provider, refer to your specific web builder's instructions for oEmbed, or try the above HTML embed code, which is more widely supported.
READ BEFORE USE *Smart Embed Links use an open-source standard called, oEmbed. This feature is currently in Beta and may not be supported by your website provider.
For more information, refer to the instructions provided by the your web builder on adding embeds, or consider using the HTML embed code instead (see instructions above).
Transparent Background
Enabling this option will make your QR Ultra menu background transparent, so you can blend the menu in with the background of your website. This option applies to QR Ultra Embed menus only.
Turning this option off, replaces the currently synced QR Ultra menu content with a menu that says Not published yet. You can also add an optional message such as "We'll be back after the holiday" or whatever you want to say to your customers who access your QR menu page while its unpublished.
This is useful if your daily menu 'expires' and you don't want stale content on your site. Simply unpublish the menu, and then re-sync when your new content is ready. Note: Unpublish does not change your QR code or public link. So you won't have to reprint your QR code flyers when you unpublish.
This button syncs your QR Ultra menu to your current printed menu, i.e, your QR menu is updated with the current contents of your printed menu, even if you haven't saved your menu yet.
If you have auto sync enabled, you won't need to click this button. Otherwise, whenever you're ready to sync new changes to your QR Ultra menu, just click this button.
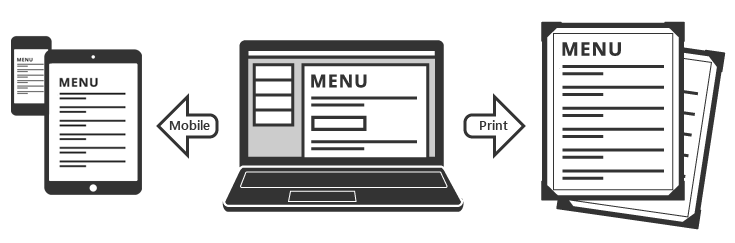
iMenuPro lets you sync your printed menus to your website menus, social media posts on Twitter, and a QR code – all in a mobile friendly format.
Mobile friendly means your web menus will be automatically reformatted and resized to look great on all devices - from small mobile smart phones to large desktop computers. And they'll load super fast since they're created in native browser code. Best of all, you can automatically sync them to your printed menus so every time you change (save) your printed menus the changes will appear immediately on your website, Twitter, and others, like magic — automatic web menu updates with no downloading required.
It works by inserting a small snippet of code (the Embed code) into your website that's generated by iMenuPro. Once inserted, your printed menu will be linked to your web menu, as long as the code is on your website.
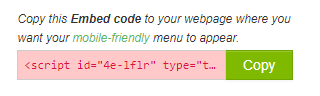
For any menu you want synced to your website, use Tools > Live-Sync Menu and click the Sync Now button. The first time you click Sync Now iMenuPro will generate a small snippet of HTML called the Embed code. Simply copy this code to your website where you want your menu to appear (you only need to do this one time). Once the code is on your site, each time you click Sync Now the menu content of your printed menu will be synced to the web, and your menu changes will appear immediately on your website.
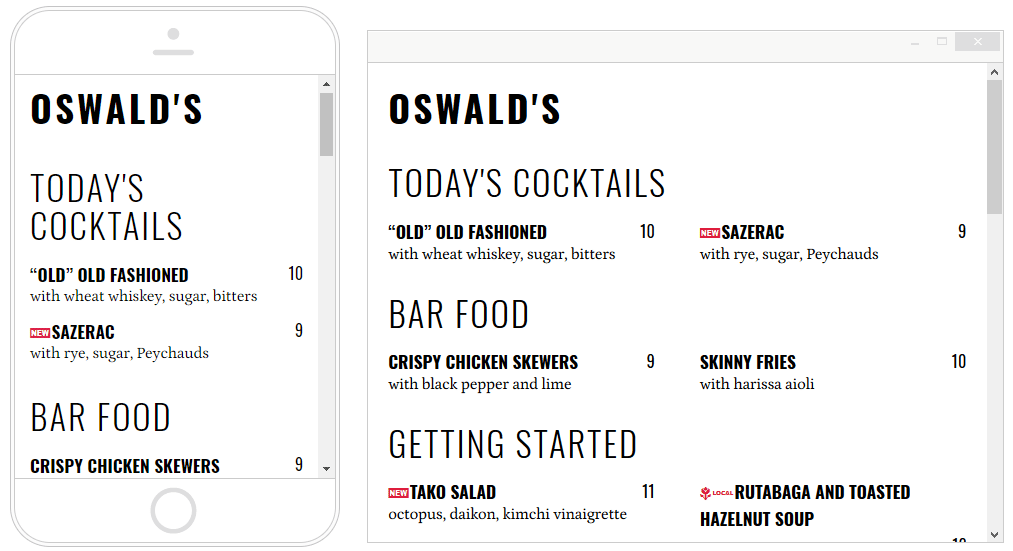
At any time (even before syncing) you can preview what your web menu will look like on a mobile device or desktop browser by clicking the preview options Mobile or Desktop at the top of the window.
The following settings are available to change the appearance and syncing method (manual or automatic):
This setting controls how your menu will look on mobile devices or larger desktop computers. Live-sync menus use different technology than their printed counterparts in order to display faster and read better on small devices.
If you want to retain the vibe of your printed menu, choose Match which will match the fonts and colors of your printed menus but scale and format them for the web and mobile devices. If you want even faster loading or better small-device readability, try one of the other Appearance options which were designed for fast loading, optimal readability, and harmonious presentation on most websites and devices.
Lets you choose the background color for your web menu. If you have selected Match for Appearance and are using a paper color for your printed menu background, the initial color here will match your current menu's paper color.
Lets you override the preset text colors from Appearance with a different color.
Clicking more... lets you make additional customizations to your mobile-friendly menu, such as hiding certain elements like floating text or displaying customizable Dietary Information labels. Adding note labels will display clickable links for all items that have a hashtagged note. These can be used to display dietary or other information about your items. You can also change the File Type for your print-alike menu if you have that feature enabled. And you can export the raw HTML used to create your live-sync menu if you need to archive it.
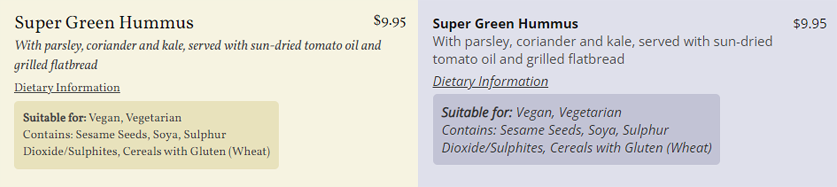
Examples of dietary details that expand when "Dietary Information" is clicked
If this setting is checked, iMenuPro will automatically sync your web menu to your printed menu whenever you save your menu (this excludes automatic menu saves by the app such as Auto-save, automatic save at logout, etc.). If you'd prefer to sync your website menu only at specific times (useful if you're making lots of edits to your printed menu that you don't want reflected on your web menu) then leave this setting unchecked.
If this setting is checked, in addition to your mobile-friendly Embed code, iMenuPro will create another unique embed code for a replica of your printed menu. The print-alike Embed code will display an image copy of your menu on your website instead of a native browser version.
The advantage of print-alike is that your website menu will be an exact clone of your printed menu – retaining all the formatting and design elements in their Technicolor glory. The disadvantage is that it will take a bit longer to load and may be hard to read on small devices such as mobile phones or mini-tablets. But, if you want an exact clone of your menu on your site or social media, this is the way to go.
Additionally, if you have a separate section or 2nd site for mobile customers, there's nothing preventing you from using both embed codes at once, in different places or on different sites.
This button syncs your website menu to your current printed menu, i.e, your web menu is updated with the current contents of your printed menu (even if you haven't saved your menu yet). If you're syncing a menu for the first time, this button also generates the unique Embed code that allows the menu to appear on your website or social media pages.
If you have Automatic Sync enabled, you won't need to click this button after the first time. Otherwise, whenever you're ready to sync new changes to your web menu, just click this button and the changes will appear on your website, Twitter tweets, and wherever else the embed code has been used.
Replaces the currently synced menu content on your website with a menu that says 'Not published yet'. This is useful if your daily menu 'expires' and you don't want stale content on your site. Simply unpublish the menu, and then re-sync when your new content is ready. Note: Unpublish does not change your embed code, so you don't have to change your website to unpublish a menu.
The Embed code is a small snippet of HTML (unique to your menu) that you copy and insert into your web page where you want your menu to appear. If you have a person who designed or makes changes to your website, commonly referred to as a Webmaster, you can email them the embed instructions by entering their email address and clicking Send.
If you also have Print-Alike enabled, a new tab will appear that contains the Embed code for the print-alike version of your menu.
Tip! Copying the Embed code to your web page only needs to be done once. If the code is already on your website, your menu changes will appear immediately on the web whenever you Sync your menu.
OneEmbed lets you switch your embedded menu to a totally new menu, without having to change embed codes.

For example, you might have two menus in iMenuPro - one for lunch specials and one for dinner specials. And you want your website updated daily at the correct times, to reflect either lunch or dinner specials. Once the OneEmed code is installed on your site, you can swap menus with just one click - no need to edit your website at all.
Normally embed codes work by being unique to specific content – for YouTube that content is a video. For Spotify that content is a playlist. For iMenuPro that content is a menu. But with OneEmbed you can share the same embed code with any menu. This lets you swap in different specials or seasonal menus at a single spot website location, without having to edit the page.
Another way to think about this is, OneEmbed means a single (one) embed on your website at a single place, that can be used by *more* than one menu. Same embed code - different menus. So the last menu synced with OneEmbed wipes out all previous OneEmbed syncs. If that is not what you want, do not use OneEmbed (remove the OneEmbed option and re-sync).
If checked, your next sync (or unpublish) will use a special embed code rather than the menu's normal code. After syncing the code is displayed in red to designate that you last synced this menu with OneEmbed.
Just like a normal embed, you can copy the special Embed code and add it to your website. Then, any menu that syncs with OneEmbed will appear on your site at that spot.
OneEmbed works with both Mobile-Friendly and Print-Alike live-sync menus (there's a special code for each type).
To return to normal embed syncing for a menu, simply uncheck OneEmbed and then re-sync.
NOTE This section describes QR codes and menus that match live-sync menus. For QR menus and codes with advanced features see our new QR Ultra.
Having a QR code that customers can scan can help those who would prefer to view your menu on their phone, rather than touching a physical menu. This may also help you comply with government restrictions during the COVID-19 pandemic, and even afterwards.
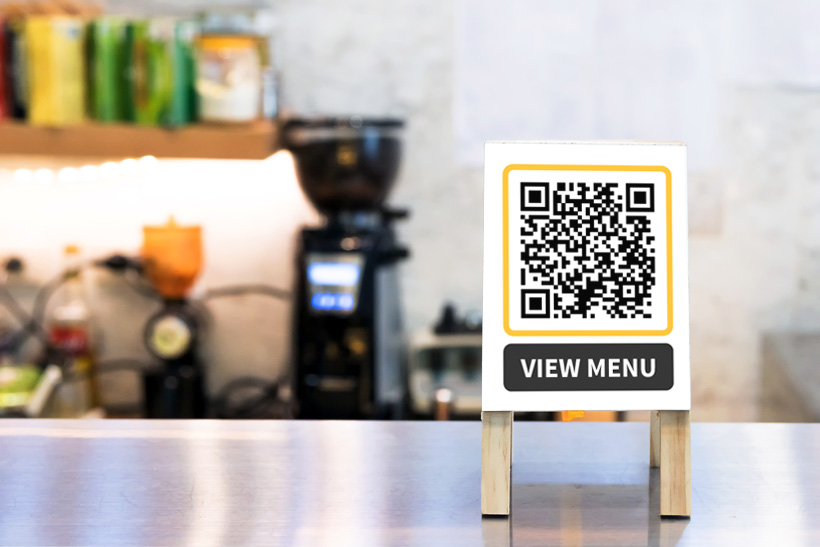
You can post the QR code in your restaurant in various ways including flyers on the walls or table tents on the tables. It's a great idea that makes sense, especially now since smart phones are almost ubiquitous.
Your customers can then simply scan the code with their phones to see your menu.

Here's how to do it:
QR which will make the QR options visible. If your menu is synced, you'll see the QR code already there. If not, just click the Sync Now button to sync.Download. Once you have the code downloaded you can use that image in any image editing software and of course, in iMenuPro. To upload it back to iMenuPro so it can used on a flyer or table tent, simply use the Insert > Uploaded Image command, and then add it to a menu as would any other image.Here are some more options you use when creating your live-sync QR menus:
You can add an optional logo at the top of your mobile-friendly QR menu. Select an image from your image collection, that you've already uploaded, by clicking the no logo box. Or you can upload a new logo image by clicking the Upload Logo ... button.
Use this option if your uploaded image is a photo and you want it to span the top of the page as a banner.
Use this option if you have a long menu and want to give users the ability to navigate, rather than scroll to different sections of your live-sync QR menu. A navigation tab will appear for each normal or alt-font menu heading.

Along with the QR code, you'll receive a Public Link that hosts your live menu permanently, independent of your website. This is the link where your customers will land once they scan your QR code. You can share this link on social media and share it with customers directly, even if you don't have a website. You can also use it as your Google My Business menu link URL. The Public link does not require a website and should not be used in your website – use the Embed code for that.
If you want instant QR codes without having to create a flyer or table-tent, just use the Print PDF button below the QR code to create either a 4-UP table tent or a page with 16 smaller QR codes (4 per row). Click the 4 or 16 next to the Print button to toggle the PDF printing options between 4 or 16.
You can change the default color of the QR frame (border) with the color selector under the QR code preview.
The bottom option for QR lets you add additional iMenuPro menus to your current menu. This enables you to combine other live-sync menus using a single QR code. You can combine mobile-friendly menus with print-alike menus also, and even combine menus from separate accounts.
To add additional menus to the QR link, find the live-sync ID's for those menus, and then enter them into the Additional Menus field, separated by commas. And then resync to generate a new QR code that includes the additional menus.
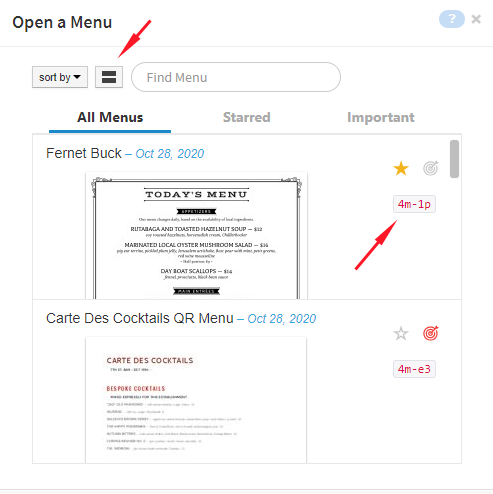
You can find your live-sync menu ID's by using the File > Open menu command and viewing your menus with the large thumbnail list view enabled - the live-sync ID's will be listed on the right.
NOTE Resyncing will resync the menu that is currently open only. If you need to update the content of the additional menus, those must be opened and resynced individually. Also note, additional menus when combined with the opened menu, will not appear in the app preview. But you can check the combined QR code by pasting the Public link into your browser. If an additional menu is missing, double-check the additional ID's you've added.
After you sync your menu, you can tweet it as well. Just click the Tweet button and follow the Twitter prompts. If you update your menu, remember to sync first before tweeting so your followers get the latest version of your menu.
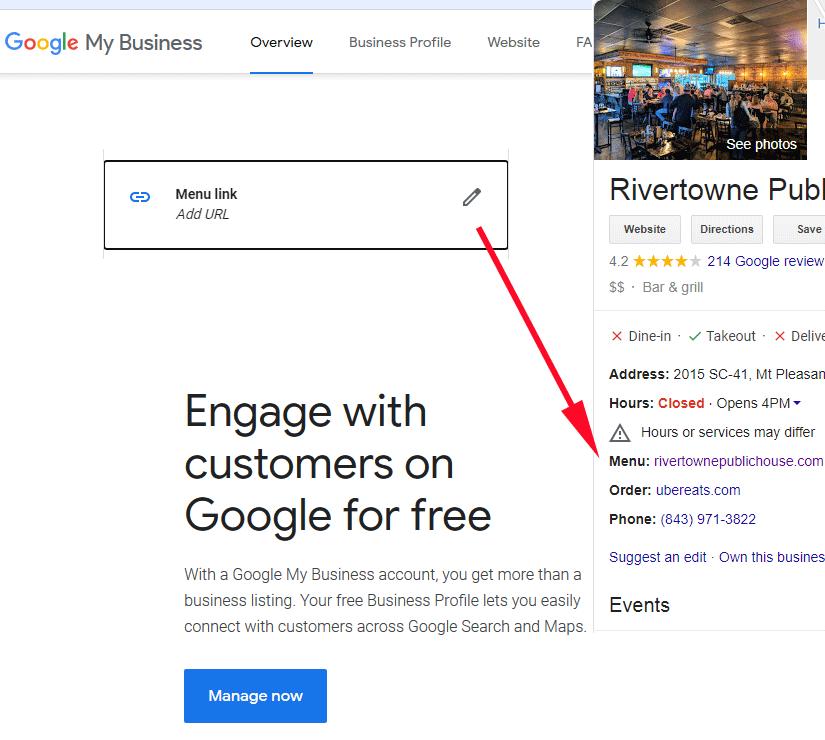
Google My Business is a great way keep your business information accurate on the web - including your menus. If you don't already have an account you should sign up HERE today. It's free and adding your menu link to your business page is free as well.
If you run a restaurant, or business with a menu of services, previously Google added a Menu link pulled from partnering companies that scrape the web looking for website menus. This practice quickly led to frustration among business owners because the scraped menus were almost always out-of-date with stale items. And the only way for the owners to change them was to pay the partnering companies (monthly) to update their very own menus. This is sort of like someone throwing a brick through your storefront window and then charging you to fix it.
After receiving many complaints, Google took notice and now lets you change the Google Menu link (Menu URL) to the actual menu on your website instead of the scraped menu.
Info and then Menu Link Add URL.Public Link.Apply.
Once your Menu Link is added, any updates to your website menu - via iMenuPro live-sync - will be immediately available to your customers who found you through Google.
Yelp also lets you add a menu link to your Yelp business page.
Edit Business Info link on your business page and click it.Menu Web Address field and enter your menu URL from your website - it will be something like https://www.myrestaurant.com/menu.html This would be the website page where you've added the live-sync embed code, but not the embed code itself - just the website page URL.Public Link.Tripadvisor also lets you add a menu link to your managed listing page.
https://www.myrestaurant.com/menu.html This would be the website page where you've added the live-sync embed code, but not the embed code itself - just the website page URL.Public Link.NOTE These instructions may change if Google, Yelp, or Tripadvisor changes its page layout, but your menu link will always be the same.
As of March 2020, in the middle of a global pandemic when restaurants needed help the most, Facebook made the decision to stop supporting links to website menus on their platform (which could include live-sync menus). Even though Google and Yelp managed to do so without issue, Facebook apparently could not. Later they also removed PDF menus, which were convenient for users since they could contain multiple menu pages in one file.
As of this writing, they only allow photo images (JPG menus) to be added via their new Menu tab feature, which is accessible form the More tabs on your Facebook restaurant page. If your menu is more than one page, you'll need to upload multiple images. They've also added some new fields such as cuisine type, payment methods accepted, etc.
A QR code is now offered as well, but we highly recommend you use iMenuPro's built-in QR menu code link as that links to your actual live-sync QR menu, which updates automatically whenever your menu changes.
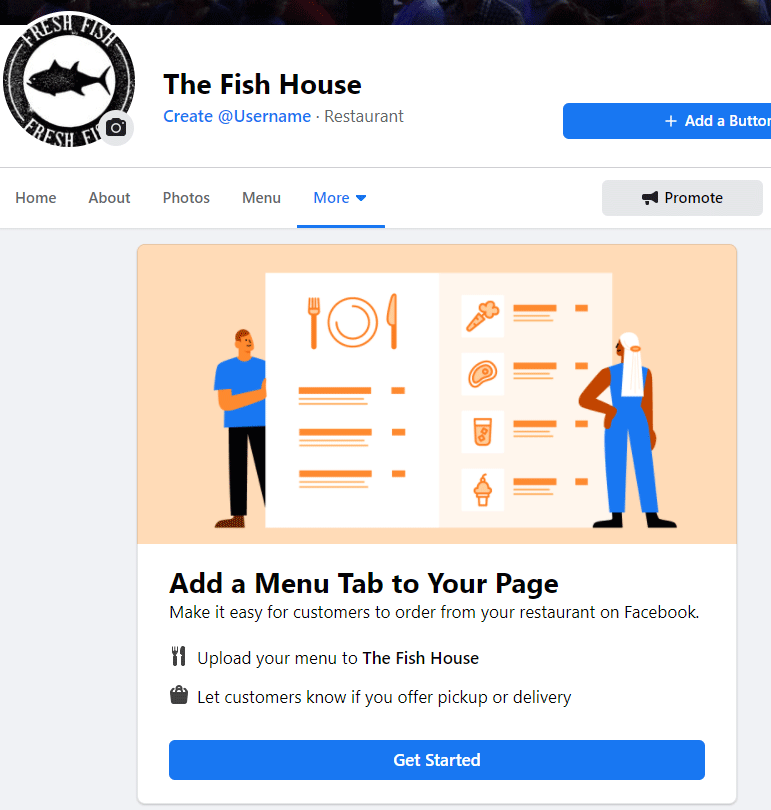
Facebook's new Menu Tab feature
So for Facebook, you'll need to update your menu images there, manually, whenever your menu changes. You can use iMenuPro to create the JPG menu images (see below).
To publish a visually identical copy of your printed menu on your Facebook page, or for use on a Digital Menu Board, use Tools > JPG Menu which lets you create a JPG menu image that can be saved to your computer and then uploaded to your Facebook page (or any other social media site) or to an HDTV monitor for use as a digital menu board.
The following JPG formats are available:
Use this format for Facebook, your website (if you want JPG rather than live-sync) or any other social media site. The resolution will be very good and the file size is smaller than the HD format, so it will download faster on the web. The quality of this format is even suitable for smaller digital menu boards.
Use this for format for large HDTV monitors that are in use as digital menu boards. The file size is larger, but the resolution is almost double that of the Normal format.
After choosing a format click the Create button to convert your menu into the JPG format. Once the process is complete, your JPG menu image appears in your browser window. Click the save page button to save it to your computer (each page will be a separate image and there's a save button for each page).
Once saved, you can then upload the image to Facebook or other sites, or copy it to a thumb drive for display on an HDTV.
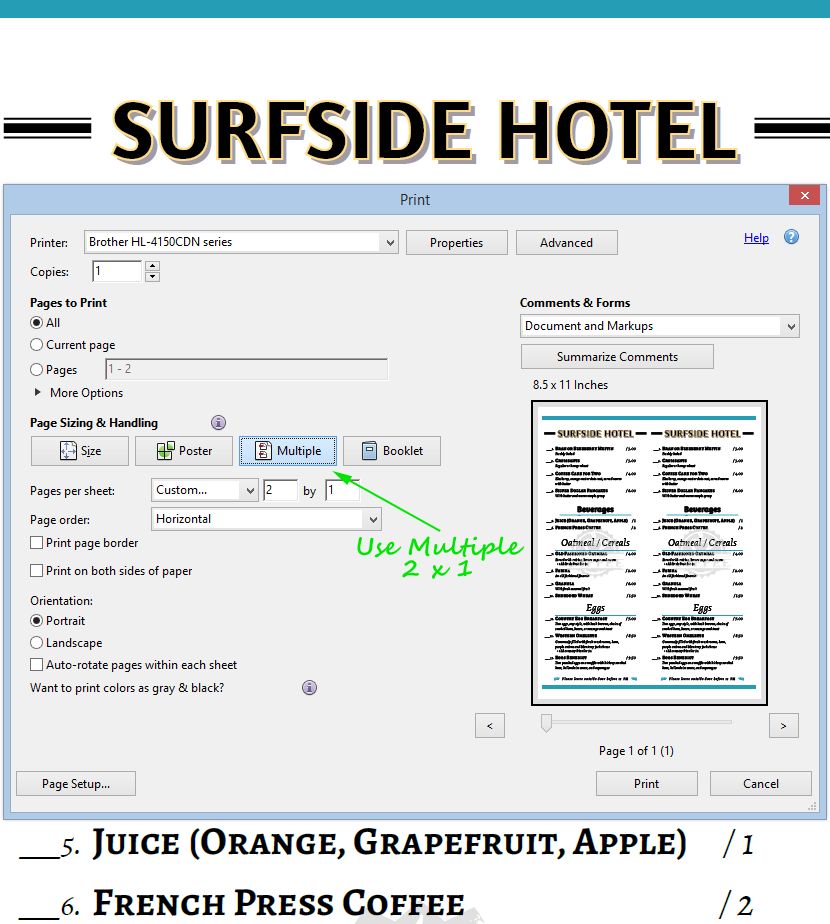
The table tent creator creates a 4-UP, 2-UP, or 3-UP PDF table tent from your current menu page. You can use any menu, any size paper, and any page orientation.
To create a table tent use the Tools > Table Tent command. For the Table Tent format choose either 4-UP or 2-UP and then click the Print button.
Once your table tent is printed, simply cut down the middle and fold.

Tip! Using card stock or heavier paper works better.
NOTE For 2-UP or 3-UP table tents, to fit identical menus onto a page the PDF page must be enlarged.
For example, for two long thin 4.25" x 14" menus on one sheet of 8.5" x 14" paper, use File > Page Setup with a custom paper size of 4.25" x 14". Then use 2-UP to create the single 8.5" x 14" PDF page with 2 menus, side by side.
For another example, to fit 2 portrait type table tents onto 8.5" x 11" paper the finale PDF page must be rotated. So use File > Page Setup with a custom paper size of 5.5" x 8.5". iMenuPro will then create 2 menus onto an 11" x 8.5" PDF page.
For a 3rd example, to fit 3 landscape type menus onto legal 8.5" x 14" paper use File > Page Setup with a custom paper size of 8.5" x 4.666". iMenuPro will then create 3 menus onto an 8.5" x 14" PDF page when using the 3-UP option.
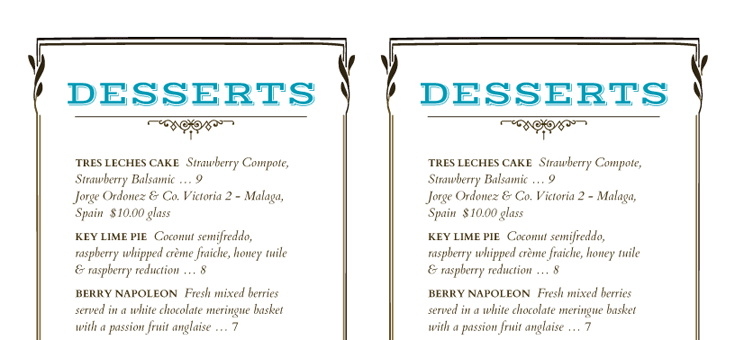
Two identical menus on one sheet of paper
The gift certificate creator lets you create gift certificates and coupons to boost sales, reward loyal customers, and increase foot traffic at your business. You can create single certificates per page or 3 certificates to a page on either US Letter (8.5" x 11") or A4 paper sizes.
To create a gift certificate use the Tools > Gift Certificate command.
Then add or change the title of the certificate, business name and address, and fine print conditions. You can also edit the certificate type such as amount $ for a certificate that lets you fill in the amount as needed for individual customer redemptions, or coupon text such as Free Drink, 15% OFF Dinner or Buy 1 Get 1 FREE.
Once your text is entered, choose a Style, change the Background (if you want a different one), add your Logo (optional), and then click the Print button to create the PDF certificate which can then be printed and cut.

NOTE If you need more than one type of certificate, make sure to print a PDF first and save it to your computer - the certificate maker saves only the current selections.
Tip! The certificate's middle 3 lines are uneditable and translated based on your Dictionary Language setting for Tools > Spell Check.
iMenuPro offers a Tools > Import Food Items allowing you to import food items from MenuPro desktop, from iMenuPro itself, from outside POS systems, or from any other app that can create a text CSV file of your data. This allows you to quickly add food items en masse to iMenuPro or transfer large food lists from one iMenuPro account to another.
During the import, each item is added to iMenuPro as a new item for all cases except one. So if you import the same item twice you'll end up with a duplicate. The exception is for iMenuPro premium accounts. Premium accounts can use a unique food item ID to update an existing item in iMenuPro, rather than insert it as a new item.
If you have exported from MenuPro or iMenuPro, you don't need to worry about format (since your export file will be correctly formatted). For other systems see below.
The following are examples of the iMenuPro Compatible Import Format (each food item is on a new line and each attribute is in the correct column):
"Name","Description","Price",,,,,,,,"Extras","Note",
If you don't have Extras, an alternate shorter format that works also is:
"Name","Description","Price",
If you have purchased the Category Labeler add-on and want to import items to existing categories you can use:
"Name","Description","Price",,,,,,"existing Category",,"Extras","Note",
If you want to update your food items using a unique ID generated from your POS use:
"Name","Description","Price",,,,,"ID","existing Category",,"Extras","Note",
Each line in the file must be formatted exactly as shown: each field (item attribute) should be within double quotation marks and the fields separated by commas. If you have a double quote within the field, use two double quotes together like this: "served with ""Angus"" beef". If you have more than one price for a single item, separate the prices with a semicolon like this: "12.95;14.95;16.85". And if using the full format, the reserved fields that are not used (the extra commas) must be included. The full format requires 12 fields on each line, and in the correct order.
CLICK HERE to download an Import Template text file.
If you are importing a MenuPro or iMenuPro export file, you don't need to worry about a template - the file will already be the correct format.
The only option for this command is the file itself.
1 Run MenuPro on your PC and select File > Utilities > Export > Food Items > All
2 Save the file mpdata_.txt to your PC desktop so you can easily find it.
3 In iMenuPro, use the Tools > Import Food Items command.
4 When the Import box appears, click Select file to import... and find the mpdata_.txt file on your desktop, select it, then click Open
5 If your file is valid, food items will appear in the Data Preview. Before clicking OK look carefully at the Data Preview to make sure your food items look correct. If they don't look right, or the Data Preview is blank, click Cancel and try again by going back to step 1.
If the food items look correct, click OK to import them into iMenuPro.
Important! After successfully importing a file, do not repeat as you will end up with duplicate food items - this command does not check for duplicates. Only use this command one time (unless you are importing single items), during your initial setup phase to migrate your foods from MenuPro to iMenuPro.
After importing, it may appear you have not imported anything if your list is not sorted by Date added. Simply use the scroll bar on the list to view your items.
1 Log into your iMenuPro account and use Tools > Print/Export Food Items
2 Pick list type Names + text + category/note then click the Export button and Save the file impdata.txt to your computer desktop so you can easily find it.
3 In the other iMenuPro account, use the Tools > Import Food Items command.
4 When the Import box appears, click Select file to import... and find the impdata.txt file on your device, select it, then click Open
5 If your file is valid, your food items from your original iMenuPro account will now appear in the Data Preview. Before clicking OK, look carefully at the Data Preview to make sure they look correct. If they don't or the Data Preview is blank, click Cancel and try again by going back to step 1.
If the food items look correct, click OK to import them into your new iMenuPro account.
Important! After successfully importing a file, do not repeat this command as you will end up with duplicate food items - this command does not check for duplicates unless you are using unique food IDs with a premium account. Only use this command one time (unless you are importing single items), during the initial setup phase of your new account to migrate food items from one account to another. Additionally, if you are importing categories, those categories must exist on the new account before importing.
After your import is complete, it may appear you have not imported anything if your list is not sorted by Date added. But just use the scroll bar on the list to view your items.
WARNING IF YOU EDIT, BE CAREFUL! It might be tempting to edit your export file since it's an editable text file, but do not attempt such unless you fully understand the CSV format. One misplaced comma or quote mark can cause all of your data to be garbage and import incorrectly. And there is no mass delete command in iMenuPro.
To create a PDF file of all of your food items, formatted as a list, use Tools > Export your Food Items and then select the list format from the available options, and then click the Print PDF button.
To export your food items as a CSV (comma-separated values) text file, use Tools > Export your Food Items, pick a list type from the available options and then click the Export TXT button.
You can also export a single food item to a CSV text file by right clicking the food item in the food list and selecting Export Food Item.
If this box is checked, for any food item file exported from iMenuPro, row 1 will consist of the names of the exported fields. This may be needed if you'll be importing your data into a POS system.
Settings let you set preferences to control how iMenuPro operates. All (except Convert Bold Bite tags) do not change your menus directly, but can change the way certain commands work such as Print to PDF settings, Find settings, etc.
The following settings are available:
This setting controls how much page spacing is applied to your current menu page when you click the Page Spacing buttons on the toolbar or use the Tools > Page Spacing commands.
This setting controls what units are displayed and used for numeric input boxes.
This setting is the amount of time that iMenuPro waits before automatically saving your current menu in the background. You can set this from 1 to 999 minutes, or set it to 0 to turn off the Auto-save feature.
Check this box to use Smart Mark when entering text for food items, headings, footer, or floating text.
Check these boxes to have the food item Description and Extras included, and also the Notes included, when using the Find Food Item search box. Unchecking them will remove these elements from the search so only the Food Item name is searched.
Entering a value here, other than 100%, will scale your PDF and JPG menu sizes based on the value entered. 50% will produce PDF menus twice as small as your iMenuPro page size. 200% will produce PDF menus that are twice as big. The same applies to any JPG menus you create. The value here does not change the page size of your menu in iMenuPro – it only effects the resultant PDF or JPG file that is produced from that menu.
Menu Scale can be useful if you're creating a menu board that is quite large, but you want to work and edit in iMenuPro with a more reasonable page size. Simply choose a normal or custom page size using File > Page Setup and then scale it up here. For example, if you have an 8.5" x 11" menu, and your Menu Scale is set at 200%, the resultant PDF menu will be 17" x 22".
NOTE Menu Scale affects all PDF and JPG menus if it's set to anything other than 100%, so make sure to reset it back to 100% when done.
If this box is checked iMenuPro will use the highest resolution images possible on your PDF or JPG menus. For PDF menus, this is useful if you are doing high-resolution printing and want to make sure your images are printed at the highest resolution. The rest of your menu elements such as text, accents, borders, and vector type images are unaffected by this setting and are always rendered at the highest quality possible.
Using this setting will likely increase the size of your PDF file however, so if you are using PDF's for website display or you have a very large menu with many high-resolution images, you'll want to turn this option off to avoid an unnecessarily large PDF file.
Check this box (recommended) to create your PDF menus using ligatures. In typography, a ligature occurs where two or more graphemes or letters are joined as a single glyph. The most common are fi and fl.
Most fonts contain at least some common ligatures, but a few fonts also contain discretionary ligatures (such as Elsie's st and ct). These ligatures, which are more decorative in nature, are typically used very sparsely so you should generally be careful with where they are used, as they can change the look of your text quite considerably.
Generally though, you will want to leave this box checked.

Crop marks (sometimes called trim marks) are short lines at the corners of a page that show where the outer edges of the paper should be trimmed. Bleeds are extra background color that extend 1/8" beyond the actual page size of your menu, and are used by commercial printers to avoid strips of white paper showing at the edges of your printed menus should the print batch be misaligned when trimmed (cut to size). In iMenuPro, bleeds only appear if you are using a background paper color.
If you're printing in-house, you won't require Crop Marks or Bleeds so leave this box unchecked. If you're sending your PDF menu to an outside commercial printer, check with them first as many won't require crop marks or bleeds either since iMenuPro PDF menus are already scaled perfectly to size.
Check this box to create your PDF menus and gift certificates using the U.S. Web Coated (SWOP) v2 CMYK color profile. Some commercial printers prefer this profile to ensure consistency across the printing process. Since iMenuPro uses RGB by default, when using CMYK for PDF your colors may change slightly on the PDF - this is normal and part of the color conversion process. (This setting does not apply to JPG menus.)
Check this box to create your PDF menus and gift certificates with PDF/Universal Accessibility. Use this option if PDF files published on your website are subject to GSA Government-wide Section 508 technical provisions. Even if they are not, we still recommend using this option for all PDF menus that you publish to your website, to improve their accessibility.
Check this box to create duplicate pages when creating your PDF menus. For example, if you have a 2 page menu and this setting is checked, when you create your PDF menu, it will contain page 1, page 1, page 2, page 2.
Check this box to prevent any bin/numbers from appearing on your menu.
Example using Acrobat and Dupe to get 2 identical menus per page (see also our Table Tent add-on for an easier method).
If this box is checked iMenuPro will check for and convert any Bold Bite tags (text formatting codes) that you've entered when drawing your current menu. Affectionately named after our favorite restaurant in Bethesda, MD., Bold Bite tags will not change your overall layout or design – they will just change the color or decoration of certain words or phrases you've tagged making them stand out in bold, underline, or a different color. If this box is unchecked iMenuPro will not convert the tags when re-drawing your menu.
What's a Bold Bite tag?
Bold Bite tags are special characters that tag (surround) a word or phrase allowing you to make that word or phrase stand out in bold or other decoration. You can use them on Headings, Floating Text, Food items (excluding the price field) and the menu Footer.
The following bites are available (if you know HTML you'll recognize some):
<b>word</b> change word or phrase to bold
<u>word</u> change word or phrase to underline
<i>word</i> change word or phrase to italic
<s>word</s> change word or phrase to strike-through
<x>word</x> change word or phrase to superscript
<c>word</c> change the color of the word or phrase to match the item's accent color.
For the Bold Bite tags to work, they must not contain spaces within the tag itself. And if you're using live-sync menus, the tags (excluding color change) will automatically transfer to those as well.
Check this box if you want your Live-Sync menus to have the date and time that they were synced at the bottom. This is useful if you're syncing daily specials to your website and want your customers to know when the menu was published.
If this box is checked, and you have made design changes such as adding a new border, changing a font, or changing a background, those changes will remain when you switch Menu Styles.
This is useful if you're not sure what layout or fonts you want but you're sure you want a certain background, border, accents, etc.
Or ... you might know what specific font you want but are not sure about the background, border, design, etc. In this example, you would use the Fonts menu to select the fonts, colors, and sizes you want. And then, if this box is checked, each time you switch Menu Styles those fonts will not change.
Tip! Your settings are saved with your account when you log out, so when you log back in they will be the same as when you left them.
Tip! If you've modified the current Style design defaults, this icon appears in the menu bar to remind you that something in the current Style has been changed.
View commands control what you see on the screen but do not affect your printed menu content.
Depending on your computing device, you can use the views to resize the size of the menu preview, view your menu in a menu cover, or overlay a grid on it - all to assist you in getting a better feel for the menu you're creating.
The View > Menu Cover command lets you preview your menu in a variety of simulated menu covers of any color. If you slide your menus into covers, as many restaurateurs do, it's often useful to ensure that your final menu design is in harmony with your covers.
After selecting a cover style and color, check Show on Menu to view the cover on your menu.
Tip! If you want the cover to appear on your final printed menu (sometimes useful for Web or Facebook menus) uncheck the Preview only option.
Facebook menu with Metal Corners
The View > Classic (foods & menu) view shows the food items on the left and your menu on the right (the default view). If you can't see your food items, you've set the view to Only menu. Simply set it back to Classic to see the food items as well.
The View > Grid command lets you overlay grid lines on your menu to facilitate accurate positions of items. You can change the color of the grid and the grid units (the size of the grid boxes).
After selecting the units and color, check the On Menu box to view the grid lines.
You can enable Snap to grid for floating text and floating images, so they align with the grid when releasing after dragging.
The zoom commands (listed as percentages under the View menu) let you shrink or enlarge the menu on the screen. For finer adjustment to the zoom level you can click or on the toolbar or use the zoom slider (to the right of the toolbar buttons).
This temporarily disables the menu text drag functionality in order to allow unrestricted access to moving, selecting, and positioning images that might otherwise fall partially under or between the menu text. Once you're done, just re-enable as it's an on/off toggle.
This temporarily locks images in place in order to allow unrestricted access to moving, selecting, and positioning menu text or floating text that might otherwise be in the way. This is especially useful if you are using an inserted image as your own menu background. Once you're done, just unlock them as it's an on/off toggle.
Tip! Click Zoom Percentage to enable/disable menu text allowing easy image moving and resizing.
Night mode toggles the app into darker hues to make it easier to create menus in environments with less light.