Example of a subheading
A Menu Heading is a line (or lines) of text that appears on your menu, usually before a group of food items.
Typically headings such as Appetizers or Entrées will have food items under with them. Food items that appear under normal headings are grouped with the heading. This allows you to tweak the layout to have just that group of foods in columns.
Headings are menu-specific - unique to the menu you are editing - they are not part of the Food Items list (database). So they appear in a separate Menu Headings list below the food items.
There are 4 types (sizes) of Headings and for each type you can change the font and size independently of the default Menu Style settings. The Heading type subheading works well below a normal heading but before the food item group such as All entreés served with a salad.
To add a new Heading click the New button at the top of the Menu Headings list, or use the Edit > New Heading command.
Or right-click in the Menu Headings list and select New Heading or Clone Heading (clone creates a new heading but prefills the text field with text from selected heading).
When you add or edit a heading, a Heading box appears. The following fields appear in the Heading box:
The text for the heading such as Appetizers, Today’s Specials, All entrées served with a salad, etc.
There are four types (sizes) of headings. The default type is Normal. The fonts and sizes of each type are determined by your Menu Style.
The Menu Styles were designed so Normal headings look appropriate for menu category headings as Appetizers, Entrées, etc. Title Headings work for your menu title (usually at the top of your menu).
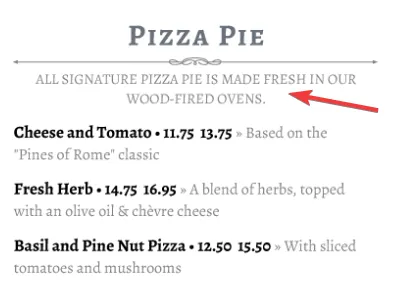
Subheadings have special properties and should be used when you need a smaller heading that follows a normal heading. Typically the subheading that accompanies the heading will further describe the heading above it.
Example of a subheading
The fourth and fifth types, Alt-Font and Alt-Font-2, give you alternatives in case you want more than one font or size. So you can effectively have three ‘Normal’ types by having some headings set to use Alt-Font or Alt-Font-2.
You can override any of the Menu Style defaults for heading fonts, sizes, or colors by using the Design > Change Font command and then selecting the heading type you want to change. This command lets you change all the headings on your menu of a particular type at once. So you can could change all your Normal headings to red, or all of your subheadings to be even smaller, etc.
Example of a Title Heading that spans the columns at top of page 1
Each Menu Style has default alignments for each heading type. You can override these defaults by selecting a different alignment here. To return to the default Menu Style alignment select (style).
Each Menu Style has default accents for each heading type. You can override these defaults by selecting a different accent here. Changing the accent here will change the accent for just this heading (to change accents for all headings of a particular type, use the Design > Heading Accents command).
To remove an accent from the heading select (none). To return to the default Menu Style accent select (style).
If checked, certain graphic accents like solid boxes or underlines/overlines will span (stretch across) the entire page including the left and right margin areas. Some restrictions apply to this setting: the overall menu must be in a single column or, for multi-column menus, the heading must at the top of the page 1 spanning the title area and be either a Title heading, a Subheading, or a Normal heading with the Span checked.
Example of headings at the top of page with a solid box accent spanning the page
Symbol icons appear in front of the heading. To use a symbol with the heading, click under Symbols and select a symbol from the list or choose none to remove the symbol. If you use both symbols, the symbol on the left will appear to the left on the menu.
The size and the color of the symbols are preset with the Menu Style but you can override these using the Design > Symbol Options command.
The spacing for heading type is automatically set with your Menu Style. The actual values used by the Style are displayed in gray in the Before and After boxes. You can override the Style spacing for any heading by clicking Custom and then editing the spacing values. This lets you put more or less space before or after the heading.
If you want to return to Style spacing, click the Style button.
If checked, overall Page Spacing, which is applied to all Headings and Food Items on a page, is not applied to this heading. So using this option lets you opt out of Page Spacing for this heading.
The most common use for this feature is locking the topmost heading on a page to the actual top margin when Page Spacing on that page would have otherwise moved it down the page. If no Page Spacing is in use on the page then this option has no effect.
If this box is anything above 1 the group of foods under this heading will appear in the number of columns selected, while the heading (and any subheadings that follow) will remain as is. This is a common and efficient use of space on menus, especially for a food group that has brief or no descriptions such as drinks, desserts, or appetizers.
Example of a Heading with Food Columns set at 2

Example of a Heading with Food Columns set at 3
If this box is checked, iMenuPro will insert a new page (or column) break before the heading. The heading is then pushed to either the next page or the next column - whichever comes first. If it is pushed to the next page, and a page does not exist already, a new page will be created.
Overrides menu columns if the heading is at the top or bottom of menu, to span across the columns. This option is menu-specific (can change from menu to menu). Note: Title headings and subheadings automatically span at the top of menu. For more info on spanning see Span Columns
Automatically formats line breaks for you. Normally you’ll want to leave this box checked so when you switch Menu Styles (or add/remove text) the heading will be formatted properly. However, if you want to override this auto-formatting and enter the line breaks yourself, uncheck this box - the heading will then appear on your menu exactly as entered.
The On Menu checkbox can be used to place the heading on the menu or remove it from the menu.
To place the heading on the menu, check the box and click OK. The heading will appear on the menu in the last position.
To remove the heading from the menu, uncheck the box and then click OK.
Click the heading in the Menu Headings list, or if the heading is on the menu, click it on the menu. Or right-click the heading in the Headings list and select Edit.
Drag the heading from the Menu Headings list and drop it on the menu. Or click the heading in the Menu Headings list to edit and then check the On Menu box. Or right-click the heading and select Place on menu.
Click and hold the heading, directly on the menu, and drag it to a new spot. Or right-click the heading on the menu and select Move Up or Move Down.
Click the heading, on the menu or in the Menu Headings list, and uncheck the On Menu box. Or (if you’re on a computer with a mouse) right-click the heading and select Remove from menu or hover over the heading with your mouse and click the X in the upper-right corner.
Click the heading in the Menu Headings list to edit, and then click the trash can icon or Delete.