Import Food Items
iMenuPro offers a Tools > Import Food Items allowing you to import food items from MenuPro desktop, from iMenuPro itself, from outside POS systems, or from any other app that can create a text CSV file of your data. This allows you to quickly add food items en masse to iMenuPro or transfer large food lists from one iMenuPro account to another.
Avoid Duplicates
During the import, each item is added to iMenuPro as a new item for all cases except one. So if you import the same item twice you’ll end up with a duplicate. The exception is for iMenuPro premium accounts. Premium accounts can use a unique food item ID to update an existing item in iMenuPro, rather than insert it as a new item.
iMenuPro Compatible Import Format
If you have exported from MenuPro or iMenuPro, you don’t need to worry about format (since your export file will be correctly formatted). For other systems see below.
POS and Other Systems
The following are examples of the iMenuPro Compatible Import Format (each food item is on a new line and each attribute is in the correct column):
"Name","Description","Price",,,,,,,,"Extras","Note",
If you don’t have Extras, an alternate shorter format that works also is:
"Name","Description","Price",
If you have purchased the Category Labeler add-on and want to import items to existing categories you can use:
"Name","Description","Price",,,,,,"existing Category",,"Extras","Note",
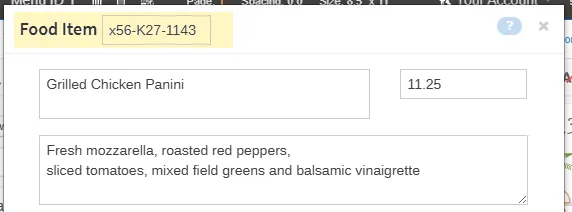
Unique ID Premium Account Feature
With premium accounts, each food item has an extra field called unique ID. You can enter the ID manually or include it in your first import file. With the import file format, The ID is the 8th field.
If you have a premium account and an ID is part of a food item, when you IMPORT new food item data for that ID, the food item that contains the ID is “UPDATED” rather than “INSERTED” as new. This allows you to keep your foods updated and in-sync with your POS data.
ID format
To update your food items using a unique ID use:
"Name","Description","Price",,,,,"ID","existing Category",,"Extras","Note", where the ID is the 8th field. Make sure the ID is unique. You can use the ID or SKU generated by your POS or make up your own.
General Formatting Guidelines for All imports
Each line in the file must be formatted exactly as shown: each field (item attribute) should be within double quotation marks and the fields separated by commas. If you have a double quote within the field, use two double quotes together like this: "served with ""Angus"" beef". If you have more than one price for a single item, separate the prices with a semicolon like this: "12.95;14.95;16.85". And if using the full format, the reserved fields that are not used (the extra commas) must be included. The full format requires 12 fields on each line, and in the correct order.
Import Template File
CLICK HERE to download an Import Template text file.
If you are importing a MenuPro or iMenuPro export file, you don’t need to worry about a template - the file will already be the correct format.
Options for Import Food Items
The only option for this command is the file itself.
Steps to transfer food items from MenuPro to iMenuPro:
-
Run MenuPro on your PC and select File > Utilities > Export > Food Items > All
-
Save the file mpdata_.txt to your PC desktop so you can easily find it.
-
In iMenuPro, use the
Tools > Import Food Itemscommand. -
When the Import box appears, click
Select file to import...and find the mpdata_.txt file on your desktop, select it, then clickOpen -
If your file is valid, food items will appear in the Data Preview. Before clicking OK look carefully at the Data Preview to make sure your food items look correct. If they don’t look right, or the Data Preview is blank, click
Canceland try again by going back to step 1.
If the food items look correct, click OK to import them into iMenuPro.
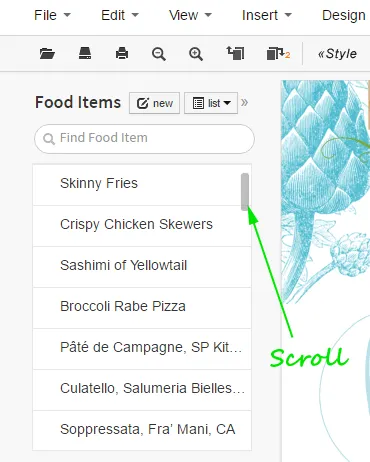
After importing, it may appear you have not imported anything if your list is not sorted by Date added. Simply use the scroll bar on the list to view your items.
Steps to move food items from one iMenuPro account to another:
-
Log into your iMenuPro account and use
Tools > Print/Export Food Items -
Pick list type
Names + text + category/notethen click theExportbutton and Save the file impdata.txt to your computer desktop so you can easily find it. -
In the other iMenuPro account, use the
Tools > Import Food Itemscommand. -
When the Import box appears, click
Select file to import...and find the impdata.txt file on your device, select it, then clickOpen -
If your file is valid, your food items from your original iMenuPro account will now appear in the Data Preview. Before clicking OK, look carefully at the Data Preview to make sure they look correct. If they don’t or the Data Preview is blank, click
Canceland try again by going back to step 1.
If the food items look correct, click OK to import them into your new iMenuPro account.
After your import is complete, it may appear you have not imported anything if your list is not sorted by Date added. But just use the scroll bar on the list to view your items.
Importing Menu Files
At this time, menu files cannot be imported into iMenuPro accounts. Only food items can.